
USING YOUTUBE’S PARENTAL CONTROLS

Watching videos online is one of the things our kids love to do more than anything else and we’re not alone. In fact, it wouldn’t be an overstatement to say that Youtube is the new kids TV. That’s why Youtube is one of the key types of internet use that parents need to feel confident about letting their children browse.
We’ve written elsewhere about using the Youtube app’s parental controls and it’s worth taking a look at the Youtube Kids app too if you want your kids to have access to a curated collection of child friendly videos. If they’re using the regular youtube site from the desktop however, the following guide is for you.
Restricted mode
As you’re no doubt aware, there are a number of things for parents to be wary of when it comes to youtube. As well as advertising concerns, the key risk areas are 1. inappropriate video content and 2. inappropriate comments. Youtube’s solution to these 2 problems is called ‘restricted mode’; a setting you can activate which makes sure videos marked as inappropriate are unsearchable from your account.
How it works
Inappropriate content is identified both via Youtube staff and users flagging videos and comments as well as using the age settings and content descriptions the video uploader puts on their video when they upload. Restricted mode works ok, but obviously relies to a certain extent on the honesty of uploaders and there’s a chance that something will slip through the net (in which case flagging it yourself would obviously help contribute to the system’s overall effectiveness).
Setting up restricted mode
Setup Youtube’s restricted mode by turning on the setting with the same name, found by scrolling to the bottom of any Youtube page. When you change the setting to ‘on’ you’ll also see a link offering to ‘lock restricted mode on this browser’. If you think your children might actively look for ways to watch restricted videos, you’ll definitely want to turn this setting on. It uses your Google password to block the setting from being turned off. Be sure to press ‘save’ once you’ve turned the restrictions on.
Loopholes
Again, if your kids are looking for ways around this restriction, they could potentially go to Youtube in a different browser. This is easy enough to anticipate though, by turning on restricted mode in all browsers on the computer. Particularly determined children could potentially download a new browser and browse there, but if they know about incognito browsing that’s likely to be their loophole of choice as the restrictions won’t be applied when browsing incognito.
Worth turning on
Ultimately the only way to be 100% certain of what your children are watching online is to be present in the room where they’re doing it. Short of that though, whilst it’s not perfect, Youtube’s restricted mode is a good starting place and definitely worth having turned on as a first line of defence against the commonplace cursing and other inappropriate language and content easily stumble-uponable in Youtube videos and comment sections.
MAKING YOUTUBE SAFE: PARENTAL CONTROLS SET UP FOR APP AND MOBILE SITE
YouTube is the biggest video hosting service in the world. Its database contains a wide range of video material from cartoons and movies to video instructions and unique science material. Parents and kids all over the world like spending their family time watching videos on YouTube. Kids can be easily occupied when all their favourite characters are just a click away. Very often parents give devices to kids and do not control the content children can watch, but it is very important to do so.
YouTube is great video storage, but its database is also full of videos that are inappropriate for children. The content can be explicit or even dangerous. So sometimes watching YouTube can even be harmful.
However, there is an easy way to block a lot of that unwanted content with the help of YouTube’s parental control settings.
How to block explicit content on mobile devices and make YouTube safe for kids
On mobile devices you can install the YouTube app from the relevant store or just use the YouTube website, opening it via one of the browsers on your device.
Both options have their own way of configuring parental controls.
The YouTube app
If you use YouTube as a separate app, you can enable the ‘Restricted mode’ (what YouTube calls it’s parental control settings) by following the instructions below (the images below show the settings on an Android device. On iOS the instructions are similar but some menus are in a different position):
Open the app:

Make sure that you’ve already signed in. To sign in tap on the menu button and sign in:
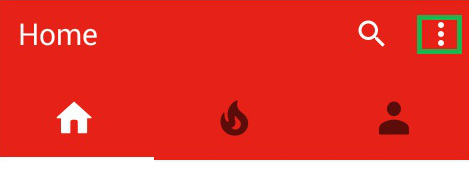

Tap on the Menu button:

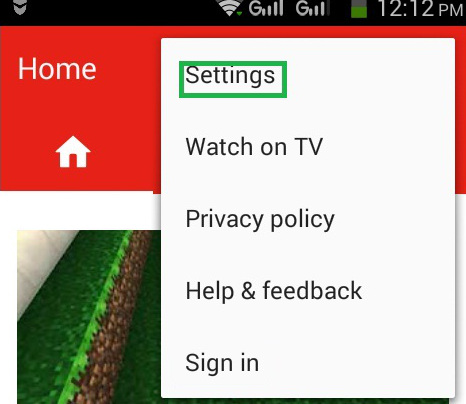
Go to Settings:
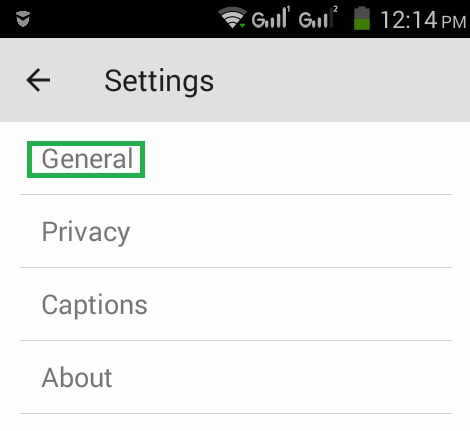
Then go to General:
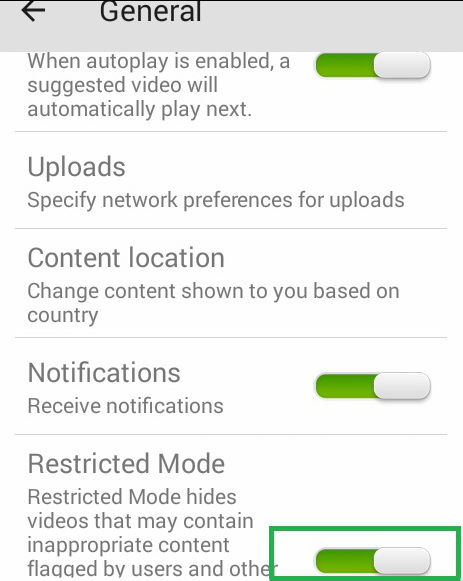
Scroll Down, Find the Restricted Mode and swipe the toggle to the right position:
On mobile devices ‘Restricted mode’ settings are associated with the device. This means you need to ensure that the restrictions are enabled before you give your device to your child even if they’re going to use their own YouTube account.
Please note that Restricted mode hides content marked by users. However, it can’t guarantee that all inappropriate videos will be blocked. For a more detailed explanation, check our article on the main YouTube site.
One more important point is that on mobile devices the restricted mode can’t be locked as it can on the desktop (either in the app or on the mobile version of the site).
Mobile version of the YouTube site
Here’s what you need to do to apply restricted mode to the YouTube website as it appears when opened using a mobile web browser:
Open the YouTube website in your mobile browser.
Sign in using your Google account:

Tap on the Menu button:
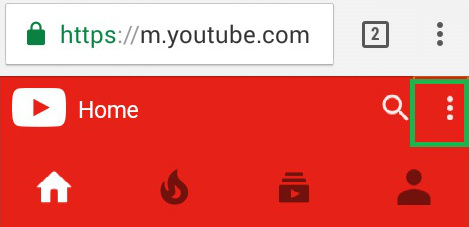
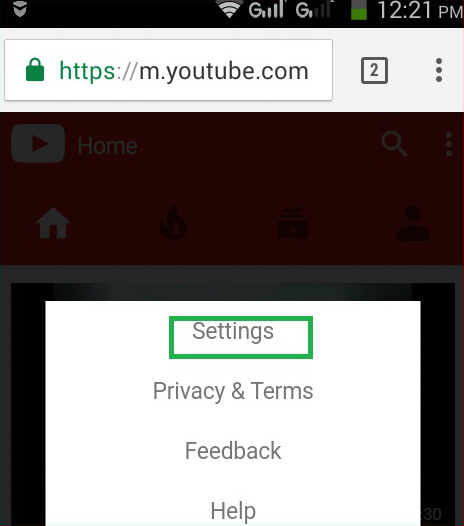
Select Settings:
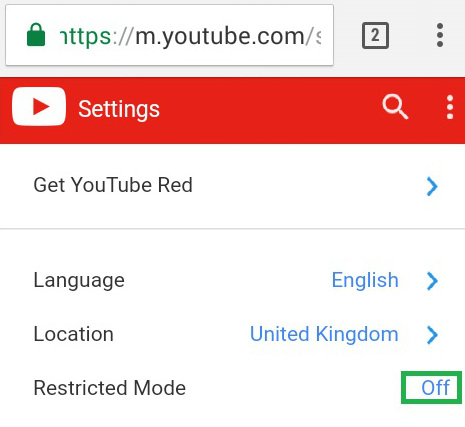
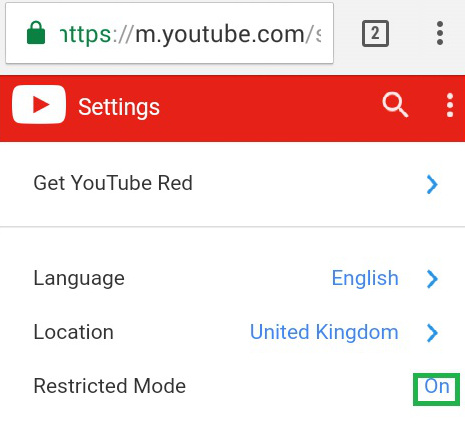
Tap on ‘Restricted Mode’ to change the option from Off to On position:
As mentioned above, the system’s not perfect, but it’s a good step in the right direction. We’d definitely recommend turning restricted mode on to protect your child from inappropriate content and dangerous video material. Hopefully it will help make watching YouTube safe for your kids.
SETTING UP PARENTAL CONTROLS FOR MAC

So you’re using Kidslox on your kids’ iPhones, but you want to set up some parental controls on the Mac laptop or desktop computer they’re using too. Let’s take a look at the inbuilt parental control options Apple offers for this platform.
Your kids will need to have a user account of their own. If the computer they’re using has only one user set up, it is the administrator for that device. Make a new user to be the administrator by following the steps on this page and then log in to that account. If the device already has multiple users, log in as the administrator account.
Open “System Preferences” and you should see an icon labelled “Parental Controls”, select it. You should then be instructed to select the lock symbol in the bottom left of the window and enter your admin name and password. Now choose from the list on the left which account you want to add parental controls to (yes, give each child their own user and you can set separate controls for each child).
The available restrictions are presented in five tabs: apps, web, people, time limits and other.
Apps
App controls include the option to turn on “Simple Finder” a restricted version of Finder which only contains Applications, Shared and Documents. This is essentially a pre-set parental controls option, it leaves the child with only those three folders available in the dock too. If you want to set more highly customised restrictions though, leave this unchecked.
The apps section also lets you choose exactly which apps your child will have access to when they use the computer. You can restrict app store apps by age rating, but also use the drop down menus to block or grant access to individual apps, widgets and utility programs.
You can keep the dock from being modified with the check box at the bottom of the screen.
Web
The web section contains three different options: allow everything, custom filter, or a pre-set but editable whitelist with everything else blocked. The second option allows for the highest level of customisation. When you choose it you are presented with two lists that you can add sites to, one list is for sites that are never allowed to be visited and one for sites which should always be allowed. Essentially, you only need to fill in the sites to block, unless you want to block a domain but leave a specific page accessible. Good, free, up to date blacklists of sites to block can be hard to find, but this one’s not bad.
For younger children you might want to choose the 3rd option and let them have access to just the sites that you specifically allow. This obviously takes away a lot of the internet’s great potential for exploration, sharing and discovery, but it can take away the risks too.
People
The people section lets you limit the contacts that your child is able to contact via email or ‘Messages’ to an approved whitelist. There’s also a checkbox that enables them to automatically send you a permission request if they want to message someone not on the list.
You can also use this section to place limits on Apple’s ‘Game Centre’, so that multiplayer games can’t be joined or ‘friends’ added.
Time Limits
Here you can set a daily limit of time that your child is allowed to use on their mac. Once the limit is reached, the screen switches to the account login screen and they are unable to log back in until the next day. The function allows you to set separate limits for weekdays and weekends. You can also set up a bed time or other regularly scheduled period when mac use is completely off limits.
Other
In the ‘Other’ section you can block or allow certain specific features including: built in camera, dictation, profanity in the dictionary, password changing, printer administration and cd burning.
Are they effective?
As with all parental controls Apple’s Mac controls will be most effective for use with younger children. Opportunities to work around or side step them (eg. using a friends device) will always be findable. That said, the Mac controls make a solid tool in the hands of the concerned parent.
While all of the features described could become more flexible (eg. Kidslox lets Premium users set an unlimited amount of down time schedules rather than just one at bedtime), for inbuilt, system based parental controls the Mac controls can be described as comprehensive. Before you go hunting for a more expensive paid solution, give these a try, they might just meet your needs.
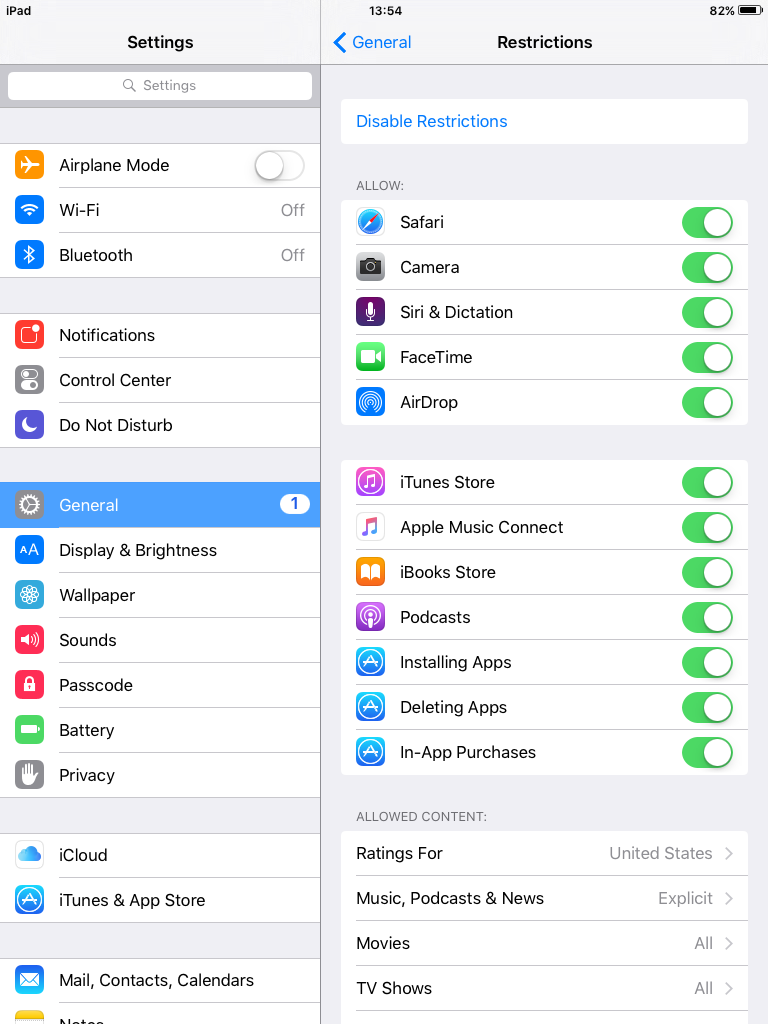
MODERN PARENTING: USING IOS PARENTAL CONTROL RESTRICTIONS
This is the first in a series of articles exploring some of the technical know how essential for 21st century parents. From learning which tools to use through to tips and tricks for getting the most out of them.
We’re going to begin by taking a look at iOS “Restrictions”, the inbuilt parental controls that come with iOS devices. If you’re not familiar with them, you’ll find them in the general settings on any iOS device, they’re called “Restrictions” so they’re easy enough to find.
Setting up iOS Restrictions
When you first turn them on, Restrictions requires you to choose a unique password which will control your restrictions. Don’t forget this one! As Apple warn on their Restrictions page, “If you lose or forget your Restrictions passcode, you’ll need to erase your device and then set it up as a new device to remove the Restrictions passcode.”
Once you’ve chosen a password you’re offered a long list of things that you can turn off. If you turn something off, it becomes completely inaccessible on that device for all users. It can only be turned back on again in the restrictions menu. Apps that are turned off no longer appear on the home screen. You can also block unwanted changes to the system and unwanted purchases including in-app purchases. If you want to turn off or edit your restrictions, you’ll need to enter you Restrictions passcode to do so.
Practical uses
The practical uses of these restrictions seem fairly self evident; you turn off apps, functions and privacy and account settings that you don’t want your child to be able to access. This is particularly useful for situations where you’re sharing your own device with a child and want to be able to restrict some elements, you might have the restrictions set up as you want them all the time and you simply enable those restrictions when you pass the device to the child.
It’s also great for putting a hard, permanent block on inappropriate content and abilities on devices you give to your children on an ongoing basis. This is probably the main intention behind the Restrictions functionality. When you purchase an iOS device for your child, just make sure you take some time to set up the appropriate restrictions before you hand over the device.
Limitations
One weakness of this system is that it doesn’t allow you to turn off specific apps, only collections of apps grouped together by their age rating. This means that if you have an offline game and an educational app of the same age rating, you can’t just block the game, you have to allow access to both or restrict both.
Another frustrating quirk is that if you block any apps using this system and then disable the restrictions, all apps on the device get returned to the screen in alphabetical order and outside of any folders. This obviously isn’t an issue if you’re setting permanent device restrictions, but if you want to allow different settings at different times it can become tiresome.
Two more desirable functions currently not available include remote changing of the restrictions and multiple restriction settings (to allow different restrictions for different children).
Using iOS Restrictions in combination with Kidslox
iOS Restrictions are a powerful tool in the parents digital arsenal. Used in combination with Kidslox parental controls their full potential can be realised. Kidslox iOS version allows parents to remotely implement and change restrictions on a device both manually and on a pre-scheduled basis. This means that you can for example remotely turn all restrictions on when dinner’s ready, blocking all games and blockable functions and getting your children’s undivided attention. It also means that you can allow some functions eg. facetime and camera without allowing others eg. 3rd party apps and then change the settings to allow the apps at a time of your choosing.
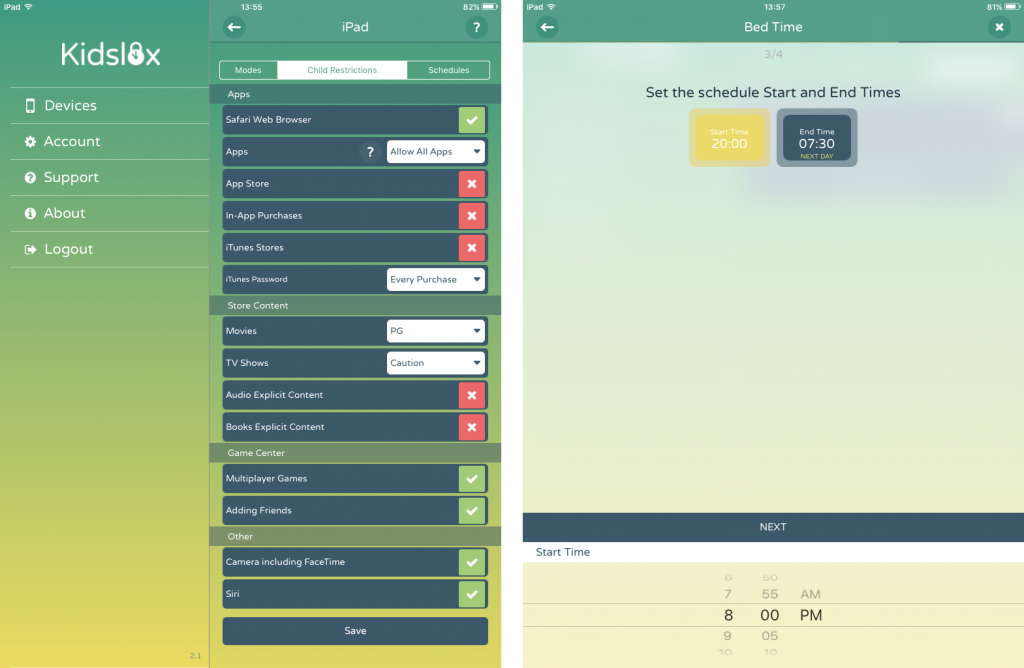
In addition, because use of Kidslox often involves changing between different Restrictions set-ups, we’ve developed a work around solution to the problem of app rearrangement. It’s called Icon Fixer and it keeps apps in the right places (so long as they don’t get moved around while restrictions are in place). We’re still hopeful that Apple will make a change to their own system in future rendering this little add on unnecessary, but until that happens, Icon Fixer is your friend.
Finally, Kidslox has a mode called ‘Parent Mode’ where no restrictions are in place and everything is accessible. Whilst this mode is originally designed for use by parents, some parents choose to use this mode as the freest level of restrictions for their child. iOS Restrictions allow you to customise ‘Parent Mode’. Any restrictions manually put in place via the Restrictions page (in the device settings, not in Kidslox) will apply to the phone at all times, even in Parent Mode.
INTERNET FILTER FOR IPHONE: PARENTS’ GUIDE

As parents of a generation born it seems, with cell phones in their hands we find ourselves with a unique challenge. While there are plenty of upsides to modern gadgets they come with concealed dangers as well. Teens (along with the rest of us) now have practically unlimited access to the Internet and naturally we worry about the sort of content they discover online. So internet security has become as important as any other type of protection we feel the need to provide in our role as caring parents.
Despite this, a large majority of parents across the world either monitor their children’s Internet activity by checking manually on what web pages are visited or don’t place any sort of protection at all. Perhaps that’s in part because they don’t realise that there are technical solutions like internet filters or parental control software. Perhaps they feel that such tools are overly intrusive of their child’s privacy.
Let’s take a look at some statistics.
- Nearly 70% of preteens confess to hiding their online activities from their parents
- 33% of parents reported they have difficulties with keeping track of their children’s Internet usage on a smartphone
- 53% of parents apply some kind of parental control to manage their child’s Internet use.
The most effective way to filter out undesirable content is to use an internet filtering software. But where to start?
How to set up an internet filter on iPhone using the native Restrictions
Having an iPhone is the dream of many young people today. But if you’ve decided to buy this device for your teen, you should keep internet security in mind. Apple has settings allowing you to block adult-themed content for Safari. You can find these Settings in device Restrictions where you’ll be able to limit adult sites, social media or other inappropriate materials. You can also prevent kids from downloading songs containing explicit content or making in-app purchases. In fact, using the native iOS restrictions is a fairly quick and easy solution for applying an internet filter to an iPhone.
The only problems are that the inbuilt restrictions don’t go quite far enough and that they’re not at all flexible. There are a number of ways smart youngsters can skirt the restrictions unnoticed, like installing 3rd party browsers which aren’t covered by the restrictions. There’s also no way to adjust the level or timing of the restrictions to allow for different situations. Instead you choose the settings you want and set them for good. For filtering the web, this is a pretty good standard, for other restriction functions it’s much less convenient.
Parental control solution
If you want a customizable tool to use as an internet filter for iPhone, then parental control software is just what you need. It makes it possible to take control of the child’s iPhone remotely from your own Apple (or Android) device. The content blocking feature on Kidslox allows the blocking of all sorts of inappropriate content including porn, violence, gambling, and much more. Altogether, over 4 million inappropriate sites are blocked with Kidslox content filtering system enabled. The database of blacklisted URLs is updated on a weekly basis so you can keep your children protected. You can also add individual sites or domains that you want to shut down. Additionally, you might like to enable Google SafeSearch and Bing Safe Search which block inappropriate search results from showing to your kid.
Another great option is Youtube restricted mode that filters YouTube results to ensure mature content is not shown to teens. While these settings can be turned on manually from each individual service, turning them on via Kidslox is convenient and ensures that all browsers are covered.
But that’s only part of the feature set Kidslox offers. You can also block internet access, Safari or any other browser, individual social media services, explicit content and much more. Beyond that, parental tools allow you to restrict and monitor screen time usage, set schedules for homework or family time and block individual apps. There’s a lot of functionality, so whatever your families approach to screens, Kidslox is likely to be a good fit.
Conclusion
If you’re not looking for flexibility, but just want to turn on the security settings and let Apple do the rest, you might choose to rely on the basic solution that the iOS platform offers. Our experience though, suggests that Apple’s filter is fairly easily bypassed and doesn’t provide much by way of fine-tuning. That is why if you’re looking for out-of-the-box features, specialised parental control software like Kidslox would be a great addition to your kid’s mobile device. With parental software installed on your child’s device you can be much more confident that they can safely surf the web without bumping things you don’t want them to see.
USING NETFLIX PARENTAL CONTROLS

With over 81 million users worldwide, the Netflix service is a household fixture that many families rely on when it comes to film and television streaming. Better still, it’s compatible with most different types of device so your account covers viewing on tablets, phones, internet tv’s and more.
But when it comes to providing comprehensive parental controls, the Netflix offering is sadly on the lax side. Still, they do offer some parental control options and this quick guide will show you how to get the most out of them:
User profiles
Hover over the icon in the top right of the screen and select the “Manage profiles” option (note you can only make these change from a computer or mobile browser, not from the Netflix mobile app). From here you can set the restrictions for your different profiles as well as creating new profiles if needed. There are four settings available “little kids”, “older kids”, “teens” and “adults”. The restriction you set will limit what material can be viewed using that profile. Different parts of the world use different rating systems. Check here to find out what ratings are connected to those 4 categories in your region.
PIN code
You can also set a PIN code for a profile which is then used to access content above the age limit. Set your PIN code by going to the “Your account” page, selecting “Parental controls” and entering your account password. Once a PIN is created, it will need to be entered to watch any material above the age rating set to the profile.
Problem points
There are a number of fairly fundamental problems with this system which make it particularly easy for children to bypass if that’s what they’re looking to do. If you have younger children or your children will not be actively seeking to access content you don’t permit them to view, you might well find that it adequately meets your needs. If your kids are likely to try and push at those boundaries, Netflix parental controls won’t hold them back, here’s why:
- Children can easily manually change to another profile. If you have multiple profiles set up with different restrictions in place, a child can enter a profile with less strict restrictions simply by pressing the current profile icon and then choosing a new one. There are a couple of potential ways to solve this problem:
- You could have just one profile and require a PIN to access older rated material. This way though you don’t get such a personalised viewing experience; your child will be offered shows you watch (which might require a PIN) and you will be offered their favourite cartoons etc. too.
- Set a restrictive PIN on all profiles. Whilst it might be a little frustrating to enter your PIN every time you want to watch something it will ensure that your kids can’t crash your profile to access rated material.
- Unfortunately, both of the aforementioned solutions to the first problem can also be bypassed by a wiley child. All they need to do to gain access is create a new user profile and claim that they are an adult.
The only really effective options remaining to parents are social ones:
- You can check up on what’s been viewed recently via the “Viewing Activity” page in “Your Account”. Agree with kids about what they’re allowed to watch and check here every now and then to make sure they’re playing by the rules. They could potentially enter this page themselves and delete items from the viewing history, but Netflix warns that such deletions can take 24 hours to take effect, so there would still be a window when they could be checked on.
- Only allow viewing on Netflix when you’re around to check in on them. You can potentially enforce such a strategy using Kidslox by scheduling restrictions to hide the Netflix app at times when you’re not physically present.
TEACHING YOUR KIDS AND TEENS TO USE PRIVACY SETTINGS ON FACEBOOK

Social media
Whether you consider social media to be a good or bad place for teens to be generally, we can all agree that the more information we make publicly available, the more vulnerable we leave ourselves. That’s why it’s crucial to make sure your kids understand how to set their privacy settings on Facebook and other social media networks.
Privacy issues
Once something’s public, it can potentially be shared by friends and followers too, so we’re not the only ones with a say in our privacy levels. We’re not even talking about ID theft, online abuse or other serious privacy problems here. Sometimes we post something personal because we want it to be seen by people who are close to us, but would be uncomfortable with the idea of those same photos, videos, words, etc. being seen by others.
It can be hard to keep track of the permissions we’ve set, especially if we have accounts on lots of different social media networks. Our children are even more vulnerable in this area. Many are the parents who’ve found themselves comforting tweens and teens who posted too freely and wound up being mocked, verbally abused or otherwise upset by the response to their activity. At the same time, social media is has become an integral element of teenage social life.
Privacy settings on Facebook
There are several elements of Facebook’s privacy settings which it’s worth going over with your kids. You can use them to make your Facebook account safer. Find them under the Privacy section in Account Settings.
- Who can see your posts? You can limit your audience just to your friends or even make some posts visible to yourself only. You can also set visibility filters to individual posts.
- Who can see your friends list? We’d recommend you set the “Only me” or “Friends” filter to limit the number of people who can get extra information about you by looking at your connections list.
- Who can send you a friend request? It’s wise to limit this group to people you have common friends with to protect your teen/child from predatory strangers.
- Who can see your email address/telephone number? We strongly recommend you not to make this information public at all.
- Do you want search engines outside Facebook to link to your profile? To avoid having your child’s profile page appear in Google search results, be sure to set this to “No”.
Additional safety tips
- Watch what you post. Sometimes kids and teens bring trouble on themselves by posting texts and photos they’d have been better off not posting. Teach your kids to recognise what is and isn’t appropriate for posting on Facebook.
- Check out the privacy settings in other social media apps you use because they can potentially also affect what turns up in your Facebook feed (and of course it’s worth checking what their settings allow for their own sake).
- Do not share additional personal info like your birth date, home address or pictures of the driver’s license you just received.
- Be especially watchful when linking together different apps like Facebook and Instagram/Twitter.
- Remember that all social media platforms reserve the right to change their privacy policy. When they do, they tell you about it, but it’s the sort of notification that many of us are inclined to click through and ignore. If that’s you, make sure you return to those settings every once in awhile and check that they still allow the things you think they do!
- Try using a parental control app to protect your child, especially if you think that they’re not fully capable of managing the privacy settings of for their device or social media account themselves.
Please, share with us your ideas of how we can make social media a better place for our children.
FAMILY LINK PARENTAL CONTROLS FROM GOOGLE

A big announcement
Google recently announced the launch of their parental control app for Android called Family Link. The app can manage the apps kids are using, monitor their screen time and set some other basic digital rules like remotely locking child devices when it’s time for bed (sound familiar?)
Quaking in our boots
I’ll be honest, it’s a little intimidating to see a tech giant like Google moving into your niche! At the same time, we take it as a great encouragement and validation of Kidslox work. The question of screen time control is clearly a fundamental one for modern parents. And by creating their own parental control app Google have recognised that it is a problem which is widespread and worth solving.
As an established, working solution to the problem, this is actually good news for us. Family Link is still taking its first steps into the world of parental control. Their beta is available only to families with a child under 13 years of age, living in the US, where the child has an Android device running Android 7 (who’s giving their pre-teens the latest, top of the range devices?!). It’s pretty specific. In part because Google is perfectly placed to take their time with projects like this (by the time everything’s working as desired Android 7 might well be widespread (probably in around 2 years time)).
Will it cover iOS?
Kidslox on the other hand is available to everyone, everywhere. It runs on Android devices running Android 4 and up. And as the original cross platform parental control solution, it also runs on iOS devices and lets you control one platform from the other in either direction.
Perhaps Family Link will come to that. Their FAQ says that it’s not available on iOS “at this time”. On the other hand, one of their priorities is obviously to get kids hooked into the Google ecosystem of programs from a very young age. Use of the app begins with the creation of a Google account for the child, initially under the supervision of their parents. From the age of 13 onwards, the child’s submission to the app becomes voluntary (Google offers them the choice to manage their own account or continue to be managed by their parents) as that’s the age at which they can in theory create their own Google account without their parent’s permission anyway.
Not only does that leave parents of young teens wondering how much control they’ll really have, it also leaves the question of whether iOS will ever be supported unclear. Google and Apple don’t tend to play nicely with each other when it comes to these sorts of integration questions.
Family Link features
Family Link’s announcement mentions three main features. Let’s take a quick look at them:
- Setting times when the child’s device becomes inaccessible to them (eg. bedtime). This has become a parental control standard feature. Good to see it here. Kidslox schedules are considered a core feature and many parents rely on them as the main control mechanism for managing their children’s screen time.
- Setting daily screen time limits and viewing your child’s daily activity. These features are very much in line with the way that many of us want to manage our children’s screen time. Allowing a set amount of time per day that the child can then manage themselves. That’s why Kidslox recently also introduced daily limits for both iOS and Android.
- Blocking individual apps and screening new downloads. Making individual apps unavailable is a helpful tool in the parents arsenal. That’s why on Android Kidslox allows daily limits on individual apps as well as simple blocking.
Does it measure up?
Overall, Family Link’s feature set seems reasonably standard. Their privacy noticementions a couple of other features like geolocation and general privacy settings management too.
There are a couple of neat ideas that Kidslox doesn’t have yet, but which are high on our list of future developments, including daily activity reports and approving newly downloaded apps.
There are also a few functions which Kidslox offers and Family Link doesn’t. Aside from being dual platform, Kidslox also offers content filtering to protect child devices from inappropriate content including porn, hate and violence. It also allows for a very flexible approach to household devices; any device on the system can be used to restrict any other (Kids can’t control devices as they don’t know your Kidslox PIN).
For me, the biggest question raised by Family Link is whether 13 is an appropriate age to allow children the option of leaving the parental control nest. That seems to be the exact moment when concern over social media overuse or misuse is likely to be at its highest.
It’ll be interesting to see how this product develops and what role Google envisions for it in their grand scheme of things. I’ll be sure to revisit it once it becomes a little more widely available. For my own personal use though, I’ll be sticking with Kidslox.


